map 函数是 Python 内置的一个高阶函数,用于将一个函数应用到一个或多个序列(例如列表、元组等)的每个元素,并返回一个迭代器(在 Python 3 中)。
作者归档:beiyu
lambda函数使用
lambda 函数在 Python 中是一种匿名函数,也就是说它是一种没有名称的函数。lambda 函数可以在需要一个简单函数的地方快速定义,并且它们通常用于短小的函数或回调函数中。
总体方差,总体标准差,样本方差,样本标准差
下面是总体方差、总体标准差、样本方差和样本标准差的计算方法及示例。
总体方差和总体标准差
总体方差
总体方差(Population Variance)是所有数据点与总体均值之间差值的平方的平均值。公式如下:
\( \sigma^2 = \frac{1}{N} \sum_{i=1}^{N} (x_i – \mu)^2 \)
总体标准差
总体标准差(Population Standard Deviation)是总体方差的平方根。公式如下:
\( \sigma = \sqrt{\sigma^2} \)
样本方差和样本标准差
样本方差
样本方差(Sample Variance)是所有样本数据点与样本均值之间差值的平方的平均值,但为了校正估计的偏差,分母用 (n-1) 而不是 (n)。公式如下:
\( s^2 = \frac{1}{n-1} \sum_{i=1}^{n} (x_i – \bar{x})^2 \)
样本标准差
样本标准差(Sample Standard Deviation)是样本方差的平方根。公式如下:
\( s = \sqrt{s^2} \)
示例
假设有一组数据:[ [2, 4, 4, 4, 5, 5, 7, 9] ]
- 计算总体均值:\( \mu = \frac{2 + 4 + 4 + 4 + 5 + 5 + 7 + 9}{8} = 5 \)
- 计算总体方差:
\(
\sigma^2 = \frac{(2-5)^2 + (4-5)^2 + (4-5)^2 + (4-5)^2 + (5-5)^2 + (5-5)^2 + (7-5)^2 + (9-5)^2}{8}
\)
\(
\sigma^2 = \frac{(-3)^2 + (-1)^2 + (-1)^2 + (-1)^2 + 0^2 + 0^2 + 2^2 + 4^2}{8}
\)
\(
\sigma^2 = \frac{9 + 1 + 1 + 1 + 0 + 0 + 4 + 16}{8} = \frac{32}{8} = 4
\) - 计算总体标准差:
\(
\sigma = \sqrt{4} = 2
\) - 计算样本均值:样本均值和总体均值相同,仍然是5。
- 计算样本方差:
\(
s^2 = \frac{(2-5)^2 + (4-5)^2 + (4-5)^2 + (4-5)^2 + (5-5)^2 + (5-5)^2 + (7-5)^2 + (9-5)^2}{7}
\)
\(
s^2 = \frac{9 + 1 + 1 + 1 + 0 + 0 + 4 + 16}{7} = \frac{32}{7} \approx 4.57
\) - 计算样本标准差:
\(
s = \sqrt{4.57} \approx 2.14
\)
综上所述,对于数据 [ [2, 4, 4, 4, 5, 5, 7, 9] ],我们有:
- 总体方差:4
- 总体标准差:2
- 样本方差:4.57
- 样本标准差:2.14
代码
|
1 2 3 4 5 6 7 8 9 10 11 12 13 14 15 16 17 18 19 20 21 22 23 24 |
import statistics # 数据集 data = [2, 4, 4, 4, 5, 5, 7, 9] # 计算样本均值 mean = statistics.mean(data) print("样本均值:", mean) # 计算样本方差 sample_variance = statistics.variance(data) print("样本方差:", sample_variance) # 计算样本标准差 sample_std_dev = statistics.stdev(data) print("样本标准差:", sample_std_dev) # 计算总体方差 population_variance = statistics.pvariance(data) print("总体方差:", population_variance) # 计算总体标准差 population_std_dev = statistics.pstdev(data) print("总体标准差:", population_std_dev) |
运行上述代码将得到以下输出:
|
1 2 3 4 5 |
样本均值: 5 样本方差: 4.571428571428571 样本标准差: 2.138089935299395 总体方差: 4.0 总体标准差: 2.0 |
python常见运算
按算术运算、比较运算、逻辑运算、赋值运算、成员运算、身份运算、运算符优先级以及相关库进行整理:
继续阅读numpy常用函数
NumPy是Python中强大的数值计算库,提供了许多方便的数据处理和分析函数。以下是一些常用的NumPy函数:
继续阅读plt.gca().set_aspect(‘equal’, adjustable=’box’)讲解
plt.gca().set_aspect('equal', adjustable='box') 是 Matplotlib 中用于设置当前坐标轴的纵横比的函数。这里我们详细解释一下各个部分的含义和作用。
matplotlib.pyplot.subplots
matplotlib.pyplot.subplots 函数在创建多个子图时提供了许多参数,使得创建和调整子图变得非常灵活。以下是一些常用参数及其解释:
wordpress区块编辑器中插入数学公式
在 WordPress 区块编辑器(Gutenberg)中插入数学公式有几种方法,主要包括使用插件或手动添加代码。以下是两种常见的方法:
方法一:使用插件
使用插件是最简单的方法。推荐使用的插件是 MathJax-Latex,它可以轻松地在文章或页面中插入数学公式。
安装插件:
- 登录到 WordPress 后台。
- 转到 “插件” > “安装插件”。
- 搜索 “MathJax-Latex” 并点击 “现在安装”。
- 安装完成后,点击 “启用”。
使用插件:
- 在文章或页面编辑器中,添加一个 “段落” 块。
- 使用
$...$来包围行内公式,使用$$...$$来包围块级公式。例如:
|
1 2 |
这是一个行内公式:$E = mc^2$。 这是一个块级公式: $$ \int_{a}^{b} f(x) \, dx $$ |
方法二:手动添加代码
如果不想使用插件,可以手动添加代码来插入数学公式。以下是两种常用的代码方法:
使用 MathJax:
- 在文章或页面的 HTML 模式下,添加 MathJax 脚本:
|
1 2 3 |
<script type="text/javascript" async src="https://cdnjs.cloudflare.com/ajax/libs/mathjax/2.7.7/MathJax.js?config=TeX-MML-AM_CHTML"> </script> |
- 使用
$...$来包围行内公式,使用$$...$$来包围块级公式。例如:
|
1 2 |
这是一个行内公式:$E = mc^2$。 这是一个块级公式: $$ \int_{a}^{b} f(x) \, dx $$ |
使用 KaTeX:
- 在文章或页面的 HTML 模式下,添加 KaTeX 脚本和样式:
|
1 2 3 |
<link rel="stylesheet" href="https://cdnjs.cloudflare.com/ajax/libs/KaTeX/0.13.11/katex.min.css"> <script defer src="https://cdnjs.cloudflare.com/ajax/libs/KaTeX/0.13.11/katex.min.js"></script> <script defer src="https://cdnjs.cloudflare.com/ajax/libs/KaTeX/0.13.11/contrib/auto-render.min.js" onload="renderMathInElement(document.body);"></script> |
- 使用
\[...\]来包围行内公式,使用\[...\]来包围块级公式。例如:
|
1 2 3 4 5 |
这是一个行内公式:\[E = mc^2\]。 这是一个块级公式: \[ \int_{a}^{b} f(x) \, dx \] |
通过上述方法,你可以在 WordPress 区块编辑器中轻松插入数学公式。
从数据、统计、线性代数、几何角度解释,什么是矩阵?
矩阵(Matrix)是一个矩形数组,用于表示和处理数值数据的集合。在数据、统计、线性代数和几何角度,矩阵有着广泛的应用。下面从这些角度解释矩阵:
数据角度
在数据分析中,矩阵可以用来表示多维数据。每一行可以表示一个样本,每一列可以表示一个特征。例如,一个包含学生成绩的数据集可以用一个矩阵表示,其中每一行代表一个学生,每一列代表不同科目的成绩。
统计角度
在统计学中,矩阵常用于表示和操作数据集。比如,在多元统计分析中,协方差矩阵是一个重要的概念,它用于描述多个变量之间的协方差关系。此外,回归分析中的设计矩阵(Design Matrix)用于表达回归模型中的变量和参数关系。
线性代数角度
在线性代数中,矩阵是基础的数学工具。它们可以表示线性变换,矩阵乘法可以看作是应用这些变换。矩阵的基本运算包括加法、减法、乘法、转置、求逆等。特征值和特征向量也是线性代数中的重要概念,广泛应用于各种科学和工程问题中。
几何角度
在几何学中,矩阵可以表示各种变换,如旋转、缩放、平移等。二维和三维空间中的点和向量可以用矩阵表示,变换矩阵可以应用于这些点和向量以实现几何变换。例如,在计算机图形学中,矩阵变换用于图像的旋转、缩放和移动。
例子
考虑一个简单的2×2矩阵:
\( \begin{bmatrix} 1 & 2 \\ 3 & 4 \end{bmatrix} \)
- 数据角度:可以表示一个数据集,有两个样本(行)和两个特征(列)。
- 统计角度:可以表示两个变量之间的关系。
- 线性代数角度:可以表示一个线性变换,如将向量 \(\begin{bmatrix} x \\ y \end{bmatrix}\) 变换为 \(\begin{bmatrix} 1 & 2 \\ 3 & 4 \end{bmatrix} \)\(\begin{bmatrix} x \\ y \end{bmatrix}\)。
- 几何角度:可以表示将二维空间中的点变换,例如旋转或缩放。
通过这些角度,可以看到矩阵作为一种数学工具,在各个领域都有着广泛而深远的应用。
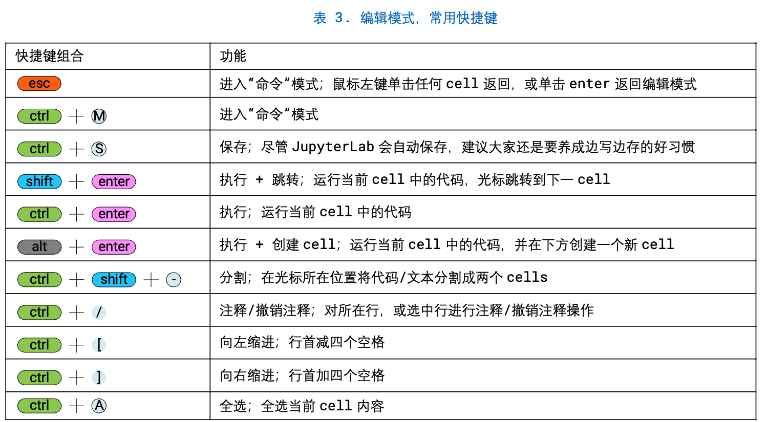
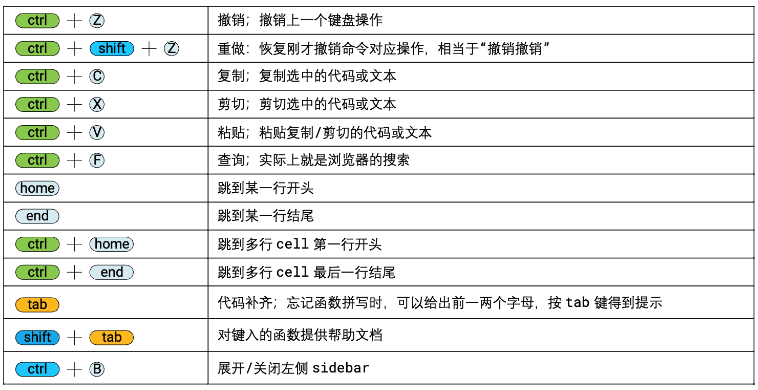
jupyter快捷键
截图来自鸢尾花书《编程不难》第三章
conda channels
在 Conda 中修改 channels 的优先级可以确保包从特定的源获取,这对于解决包的兼容性问题和加速安装过程非常有用。以下是步骤:
继续阅读anaconda-python
IDE
- JupyterLab
- Spyder
- PyCharm
jupyter命令
|
1 2 |
# 启动 jupyter lab |
jupyter快捷键
|
1 2 |
# 运行当前块代码 ctrl + enter |
Conad命令
|
1 2 |
# 查看Python库 conda list |
Python命令
|
1 2 3 4 5 6 7 8 |
# 查看已经安装的所有Python库 pip list # 调取某个特定库信息 pip show library_name # 卸载 pip uninstall library_name # 更新 pip install library_name --upgrade |
Spyder
|
1 2 |
# 在spyder编辑器中打开当前目录 spyder . |
Python
|
1 2 3 4 5 |
# 金融数据 pip install pandas-datareader # 创建web应用程序的库 pip install streamlit |
内置函数:https://docs.python.org/zh-cn/3/library/functions.html
查看python库打分:https://snyk.io/advisor/python/scoring
数学工具:https://mathworld.wolfram.com
数学社区:https://math.stackexchange.com
常用可视化包:Matplotlib、Seaborn、Plotly等
机器学习常用包:Numpy、Pandas、Statsmodels、Scikit-learn、TensorFlow、Streamlit等
不错的站点
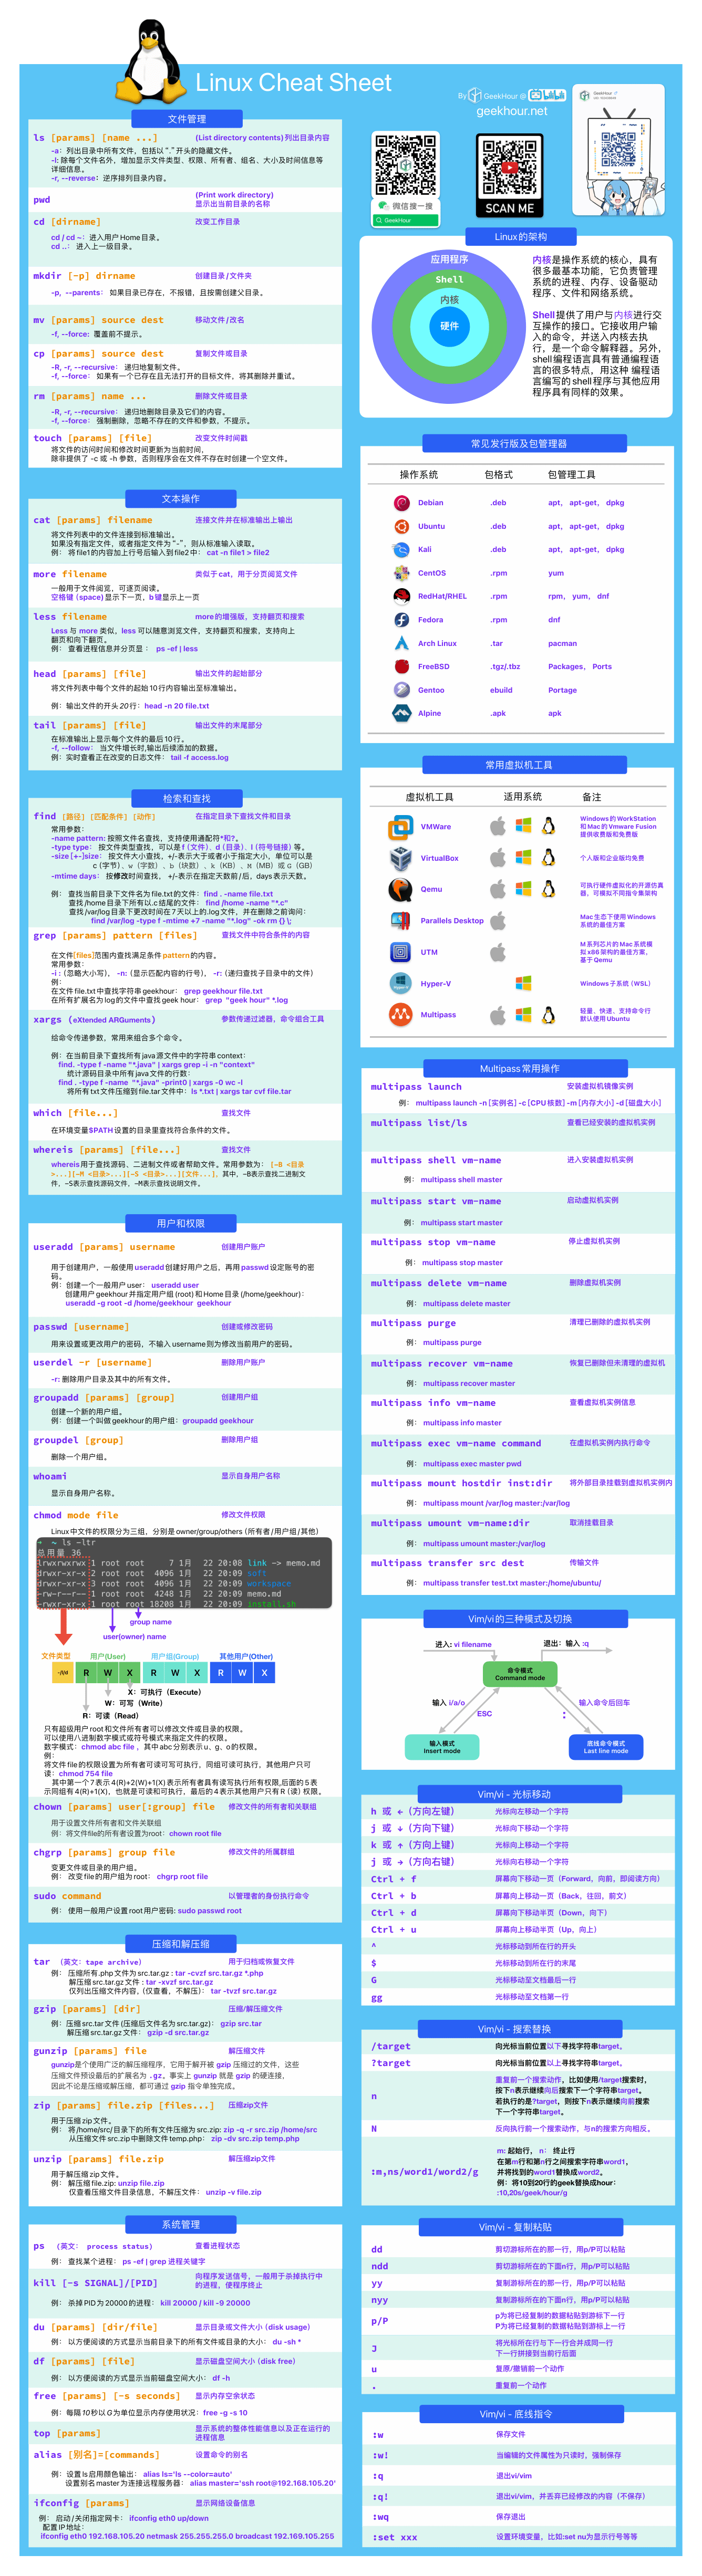
Linux速查表
资料内容来自公众号:GeekHour,学习记录于此,方便日后查阅学习。
yum解决:Error: Failed to download metadata for repo ‘appstream’: Cannot prepare internal mirrorlist: No URLs in mirrorlist
一、Centos8停止更新后,使用yum安装报如下错误:
|
1 2 3 4 5 |
[root@ce5d8a78a3b5 /]# yum install -y epel-release Failed to set locale, defaulting to C.UTF-8 CentOS Linux 8 - AppStream 78 B/s | 38 B 00:00 Error: Failed to download metadata for repo 'appstream': Cannot prepare internal mirrorlist: No URLs in mirrorlist |
二、解决方法
|
1 |
cd /etc/yum.repos.d/ |
- 进入yum的repo存储库目录
|
1 |
cd /etc/yum.repos.d/ |
- 修改所有的CentOS文件内容
|
1 2 3 |
sed -i 's/mirrorlist/#mirrorlist/g' /etc/yum.repos.d/CentOS-* sed -i 's|#baseurl=http://mirror.centos.org|baseurl=http://vault.centos.org|g' /etc/yum.repos.d/CentOS-* |
- 更新yum源为阿里镜像
|
1 2 3 4 5 |
wget -O /etc/yum.repos.d/CentOS-Base.repo https://mirrors.aliyun.com/repo/Centos-vault-8.5.2111.repo yum clean all yum makecache |
- yum安装测试是否可以yum安装
|
1 |
yum install wget –y |
wordpress .pot文件
.pot 文件(Portable Object Template)是翻译模板文件,用于在 WordPress 主题和插件中管理翻译字符串。它包含主题或插件中所有可翻译的文本字符串,但不包含具体的翻译。翻译者可以使用 .pot 文件来生成特定语言的 .po 和 .mo 文件。
如何生成 .pot 文件
以下是如何生成和使用 .pot 文件的步骤:
1. 安装和配置 Poedit
Poedit 是一个流行的翻译编辑工具,可以用于创建和编辑 .pot、.po 和 .mo 文件。
- 从 Poedit 官网 下载并安装 Poedit。
- 打开 Poedit,选择“创建新翻译”。
2. 扫描主题或插件文件以提取可翻译字符串
可以使用 Poedit 的“提取字符串”功能,也可以手动创建 .pot 文件。
使用 Poedit 提取字符串
- 在 Poedit 中,选择“文件” > “新建项目”。
- 选择要翻译的 WordPress 主题或插件目录。
- 在“项目设置”中,设置文本域和其他项目信息。
- 配置 Poedit 扫描源文件以提取可翻译字符串:
- 点击“源路径”选项卡,添加主题或插件的根目录。
- 点击“源关键字”选项卡,添加 WordPress 特定的翻译函数关键字(如
__、_e、_n等)。
手动创建 .pot 文件
如果你想手动创建 .pot 文件,可以使用 WP-CLI 工具或其他命令行工具。
- 使用 WP-CLI:
- 安装并配置 WP-CLI。
- 运行以下命令生成
.pot文件:wp i18n make-pot . languages/your-theme.pot --exclude=vendor这将在当前目录下扫描所有 PHP 文件,并在languages目录下生成your-theme.pot文件。
3. 生成 .po 和 .mo 文件
使用 .pot 文件生成特定语言的 .po 和 .mo 文件。
- 打开 Poedit,选择“新建翻译”。
- 从
.pot文件创建翻译。 - 选择目标语言(如中文)。
- 翻译每个字符串并保存。Poedit 会生成
.po和.mo文件。
4. 将 .po 和 .mo 文件上传到主题或插件的 languages 文件夹
确保翻译文件命名规范为 {textdomain}-{locale}.po 和 {textdomain}-{locale}.mo。例如,对于中文翻译文件:
|
1 2 3 4 |
my-theme/ ├── languages/ │ ├── zh_CN.po │ ├── zh_CN.mo |
5. 在主题中加载语言文件
确保在主题的 functions.php 文件中正确加载语言文件。
|
1 2 3 4 |
function mytheme_setup() { load_theme_textdomain('my-theme', get_template_directory() . '/languages'); } add_action('after_setup_theme', 'mytheme_setup'); |
示例步骤
- 生成
.pot文件:
- 使用 WP-CLI 或 Poedit 提取主题中的可翻译字符串。
- 创建翻译文件:
- 打开 Poedit,选择“新建翻译”,加载生成的
.pot文件。 - 选择目标语言,并翻译每个字符串。
- 保存文件,Poedit 会生成
.po和.mo文件。
- 上传翻译文件:
- 将生成的
zh_CN.po和zh_CN.mo文件上传到主题的languages文件夹中。
- 确保语言加载正确:
- 在主题的
functions.php文件中添加加载语言文件的代码。
|
1 2 3 4 |
function mytheme_setup() { load_theme_textdomain('my-theme', get_template_directory() . '/languages'); } add_action('after_setup_theme', 'mytheme_setup'); |
完成这些步骤后,WordPress 应该会根据站点语言设置自动加载相应的翻译文件。如果你在站点设置中选择了中文(简体),主题中的文本应该会显示为中文。
wordpress安装wp-cli,并生成.pot文件
WP-CLI 是 WordPress 的命令行工具,允许你通过命令行界面管理 WordPress 安装和操作。它可以用来执行各种任务,包括生成 .pot 文件、安装和更新插件、管理用户等等。
安装 WP-CLI
你可以按照以下步骤安装 WP-CLI:
- 下载 WP-CLI PHAR 文件:
|
1 |
curl -O https://raw.githubusercontent.com/wp-cli/builds/gh-pages/phar/wp-cli.phar |
- 检查 PHAR 文件是否正常工作:
|
1 |
php wp-cli.phar --info |
- 将 PHAR 文件设置为可执行文件并移动到系统路径:
|
1 2 |
chmod +x wp-cli.phar sudo mv wp-cli.phar /usr/local/bin/wp |
- 确认 WP-CLI 安装成功:
|
1 |
wp --info |
使用 WP-CLI 生成 .pot 文件
以下是使用 WP-CLI 生成 .pot 文件的步骤:
- 进入主题或插件目录:
|
1 |
cd /path/to/your/theme-or-plugin |
- 运行
wp i18n make-pot命令:
|
1 |
wp i18n make-pot . languages/your-theme-or-plugin.pot |
这将在当前目录下扫描所有 PHP 文件,并在 languages 目录下生成 your-theme-or-plugin.pot 文件。
示例
假设你的主题目录结构如下:
|
1 2 3 4 |
my-theme/ ├── functions.php ├── style.css └── languages/ |
- 进入主题目录:
|
1 |
cd /path/to/my-theme |
- 运行 WP-CLI 命令生成
.pot文件:
|
1 |
wp i18n make-pot . languages/my-theme.pot |
这将在 languages 目录下生成 my-theme.pot 文件。
配置 WP-CLI 扫描选项
你可以通过 wp i18n make-pot 命令的一些选项来自定义扫描和生成 .pot 文件的行为。例如:
- 排除特定文件或目录:
|
1 |
wp i18n make-pot . languages/my-theme.pot --exclude=vendor,tests |
- 指定域名:
|
1 |
wp i18n make-pot . languages/my-theme.pot --domain=my-theme |
使用生成的 .pot 文件创建翻译
- 下载并安装 Poedit。
- 打开 Poedit,选择“创建新翻译”。
- 选择生成的
.pot文件。 - 选择目标语言(如中文)。
- 翻译每个字符串并保存。Poedit 会生成
.po和.mo文件。
将翻译文件上传到主题或插件
将生成的 zh_CN.po 和 zh_CN.mo 文件上传到主题或插件的 languages 文件夹中:
|
1 2 3 4 5 6 |
my-theme/ ├── functions.php ├── style.css └── languages/ ├── zh_CN.po ├── zh_CN.mo |
加载翻译文件
确保在主题的 functions.php 文件中正确加载语言文件:
|
1 2 3 4 |
function mytheme_setup() { load_theme_textdomain('my-theme', get_template_directory() . '/languages'); } add_action('after_setup_theme', 'mytheme_setup'); |
总结
通过以上步骤,你可以使用 WP-CLI 工具生成 .pot 文件,并通过 Poedit 创建和管理翻译文件。这样可以确保你的 WordPress 主题或插件能够支持多语言,并根据站点语言设置自动加载相应的翻译文件。
WordPress Template Parts
在 WordPress 中,Template Parts(模板部分)允许你在区块编辑器中插入可重复使用的模板片段,比如页眉、页脚或其他布局部分。通过使用 <!-- wp:template-part {"slug":"header","area":"header","tagName":"header"} /--> 这样的注释代码,你可以在页面或文章中插入特定的模板部分。
以下是如何使用 Template Parts 并在 WordPress 主题中定义和注册这些部分的详细步骤。
定义和注册 Template Parts
步骤 1:创建模板部分
首先,确保你的主题支持区块编辑器。然后,在主题目录中创建一个文件夹来存放模板部分,例如 parts。
在这个文件夹中创建一个文件,例如 header.html,用来定义你的页眉模板部分。这个文件可以包含你想要在页眉中使用的区块。例如:
parts/header.html:
|
1 2 3 4 5 6 7 8 9 |
<!-- wp:group {"align":"full","backgroundColor":"primary","textColor":"white","className":"site-header"} --> <div class="wp-block-group alignfull has-primary-background-color has-white-color site-header"> <!-- wp:heading {"level":1} --> <h1>My Site Header</h1> <!-- /wp:heading --> <!-- wp:navigation {"layout":{"type":"flex","justifyContent":"right"}} /--> </div> <!-- /wp:group --> |
步骤 2: 在 theme.json 文件中注册模板部分
在主题根目录中,编辑或创建 theme.json 文件来注册模板部分。确保模板部分与其在主题中的实际位置相匹配。
theme.json:
|
1 2 3 4 5 6 7 8 9 10 11 12 13 14 |
{ "version": 2, "templateParts": [ { "name": "header", "slug": "header", "title": "Header", "description": "The site header", "path": "./parts/header.html", "area": "header" } ] } |
使用模板部分
在 Gutenberg 编辑器中插入模板部分
在页面或文章编辑器中,你可以通过以下步骤插入模板部分:
- 打开你想要编辑的页面或文章。
- 点击“添加区块”(+)按钮。
- 搜索并选择“模板部分”。
- 从列表中选择你定义的模板部分(例如 “Header”)。
使用注释代码插入模板部分
在编辑器的代码视图中,添加以下注释代码以插入特定的模板部分:
|
1 2 |
<!-- wp:template-part {"slug":"header","area":"header","tagName":"header"} /--> |
完整示例
目录结构
确保你的主题目录结构类似如下:
|
1 2 3 4 5 6 7 |
my-theme/ ├── parts/ │ ├── header.html ├── functions.php ├── style.css ├── theme.json |
parts/header.html
在 parts/header.html 文件中定义页眉模板部分:
|
1 2 3 4 5 6 7 8 9 |
<!-- wp:group {"align":"full","backgroundColor":"primary","textColor":"white","className":"site-header"} --> <div class="wp-block-group alignfull has-primary-background-color has-white-color site-header"> <!-- wp:heading {"level":1} --> <h1>My Site Header</h1> <!-- /wp:heading --> <!-- wp:navigation {"layout":{"type":"flex","justifyContent":"right"}} /--> </div> <!-- /wp:group --> |
theme.json
在 theme.json 文件中注册模板部分:
|
1 2 3 4 5 6 7 8 9 10 11 12 13 |
{ "version": 2, "templateParts": [ { "name": "header", "slug": "header", "title": "Header", "description": "The site header", "path": "./parts/header.html", "area": "header" } ] } |
使用模板部分
在你希望使用这个模板部分的页面或文章中,添加以下注释代码:
|
1 |
<!-- wp:template-part {"slug":"header","area":"header","tagName":"header"} /--> |
通过这些步骤,你可以在 WordPress 主题中定义和使用模板部分,使得页面布局更加模块化和可重用。
add_menu_page函数
阅读更多:add_menu_page函数
add_menu_page 是 WordPress 提供的一个函数,用于在 WordPress 管理后台菜单中添加一个顶级菜单页面。这个函数可以用来创建自定义的管理页面,例如插件设置页面或自定义的管理功能页面。以下是 add_menu_page 函数的详细解释和示例。
函数语法
|
1 2 3 4 5 6 7 8 9 |
add_menu_page( string $page_title, string $menu_title, string $capability, string $menu_slug, callable $function = '', string $icon_url = '', int $position = null ); |
参数解析
$page_title(string) (必需):- 页面标题,这个标题将显示在页面的
<title>标签中。
- 页面标题,这个标题将显示在页面的
$menu_title(string) (必需):- 菜单标题,这个标题将显示在管理菜单中。
$capability(string) (必需):- 权限字符串,指定用户需要具备的权限才能访问此菜单页面。
$menu_slug(string) (必需):- 菜单的唯一标识符,通常是页面 URL 的 slug。
$function(callable) (可选):- 回调函数,当用户点击菜单项时调用此函数。该函数负责渲染页面内容。
$icon_url(string) (可选):- 图标 URL,用于显示在菜单项旁边。可以是 Dashicons 字符串或完整的 URL。
$position(int) (可选):- 菜单的位置,相对于其他菜单项的位置。
示例代码
以下是一个完整的示例代码,展示如何使用 add_menu_page 在 WordPress 管理后台添加一个自定义菜单页面。
|
1 2 3 4 5 6 7 8 9 10 11 12 13 14 15 16 17 18 19 20 21 22 23 24 25 26 27 28 29 30 31 32 33 34 35 36 |
<?php /* Plugin Name: Custom Admin Page Description: 一个示例插件,展示如何在 WordPress 管理后台添加自定义菜单页面 Version: 1.0 Author: 你的名字 */ if (!defined('ABSPATH')) { exit; // 避免直接访问 } // 添加管理菜单 function custom_admin_menu() { add_menu_page( '自定义管理页面', // 页面标题 '自定义页面', // 菜单标题 'manage_options', // 权限 'custom-admin-page', // 菜单 slug 'custom_admin_page_content', // 回调函数 'dashicons-admin-generic', // 图标 25 // 位置 ); } add_action('admin_menu', 'custom_admin_menu'); // 回调函数,渲染页面内容 function custom_admin_page_content() { ?> <div class="wrap"> <h1><?php _e('欢迎来到自定义管理页面', 'textdomain'); ?></h1> <p><?php _e('这是一个自定义的管理页面。', 'textdomain'); ?></p> </div> <?php } ?> |
详细解释
- 插件头部信息:描述插件的基础信息,包括名称、描述、版本和作者。
custom_admin_menu函数:使用add_menu_page函数添加一个新的顶级菜单页面。'自定义管理页面':这是页面标题。'自定义页面':这是菜单标题。'manage_options':只有具有manage_options权限的用户(通常是管理员)才能看到这个菜单。'custom-admin-page':这是菜单的 slug,URL 中会用到。'custom_admin_page_content':这是点击菜单项时调用的回调函数。'dashicons-admin-generic':这是菜单项旁边显示的图标。25:这是菜单项在管理菜单中的位置。
custom_admin_page_content函数:这是回调函数,用于渲染自定义菜单页面的内容。- 使用 HTML 和 PHP 生成页面内容。
__('...')和_e('...')用于国际化,分别返回和直接输出翻译后的字符串。
结论
通过使用 add_menu_page 函数,你可以轻松地在 WordPress 管理后台创建自定义的管理页面。这对于插件开发和为用户提供自定义功能非常有用。你可以根据需要进一步扩展页面的功能和内容,例如添加表单、处理表单提交等。
vscode配置vue3下import自动排序
一、配置setting.json
|
1 2 3 |
"editor.codeActionsOnSave": { "source.organizeImports": "always" } |
二、安装插件并配置.eslintrc
|
1 2 3 4 5 6 7 8 9 10 |
npm install --save-dev eslint-plugin-simple-import-sort module.exports = { // ... 其他配置 plugins: ['simple-import-sort'], rules: { 'simple-import-sort/imports': 'error', 'simple-import-sort/exports': 'error', }, }; |